On Feb. 5, 2021, isolved™ released a major update that included significant changes to the product’s overall look as well as the menu structure. The release also included changes for HR, payroll, and timereporting. In this article, we’ll revisit some of the changes for two broad categories:
- HR and payroll-related changes
- Time reporting
Additional information about these new features and functionality will be available in isolved University.
If you have any questions, please reach out to your assigned payroll specialist.
HR and payroll-related changes
isolved rebranding
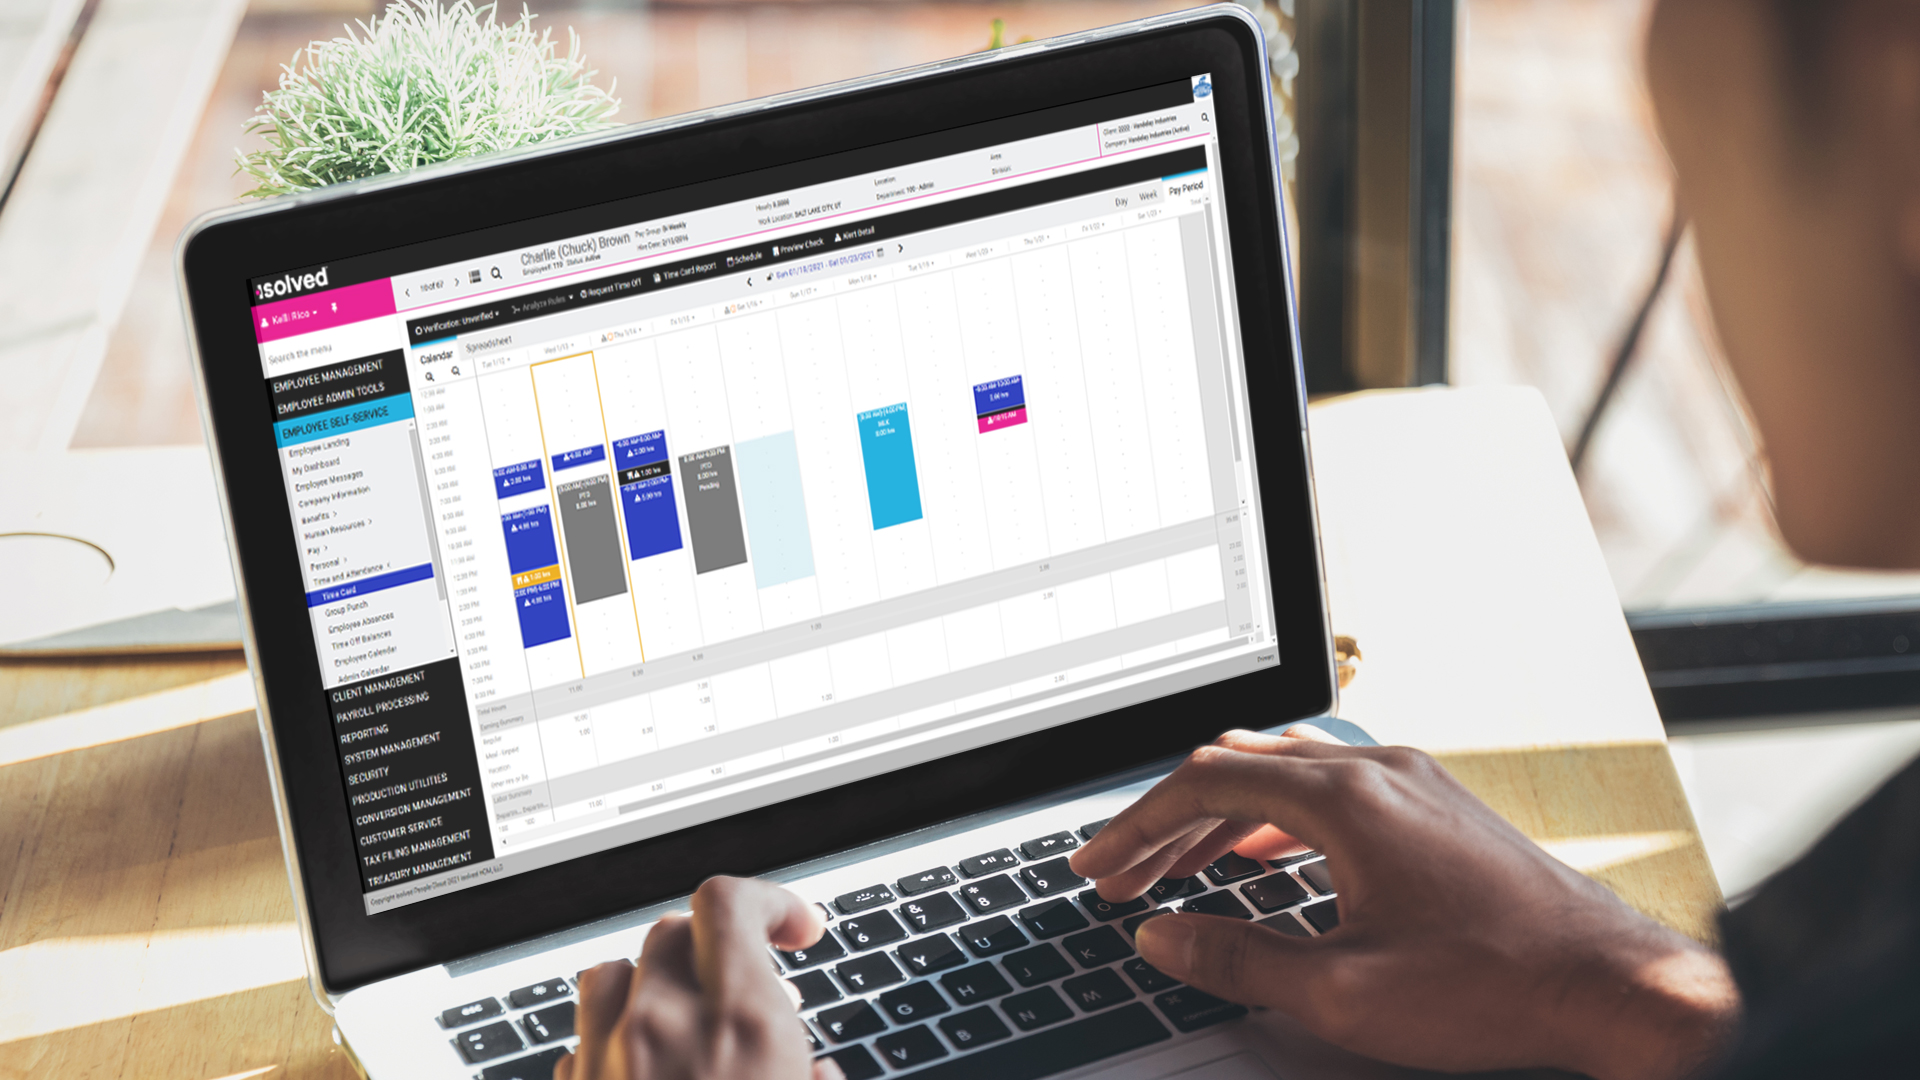
When you first logged into isolved after the release, you likely noticed that the platform’s look changed. This was done to reflect isolved’s recent rebranding effort. As part of that initiative, you now see an ADA-compliant color scheme when navigating the platform.
General navigation updates
Menus
- The employee menu has a pink background.
- Main menu headings in the navigation bar on the left have a black background with white lettering.
- When you select a main menu, the background will change to light blue.
- When you select a submenu, a light blue border will appear.
- When you select an item on the main menu or submenu, it will be highlighted in royal blue.
Main window
- When you select an item in the main window in the screen’s center, it will be identified by a gold outline.
Action bars
- Main action bars have a black background and white lettering.
- When there are tabbed options underneath a main action bar, your selected tab will have a light blue background.
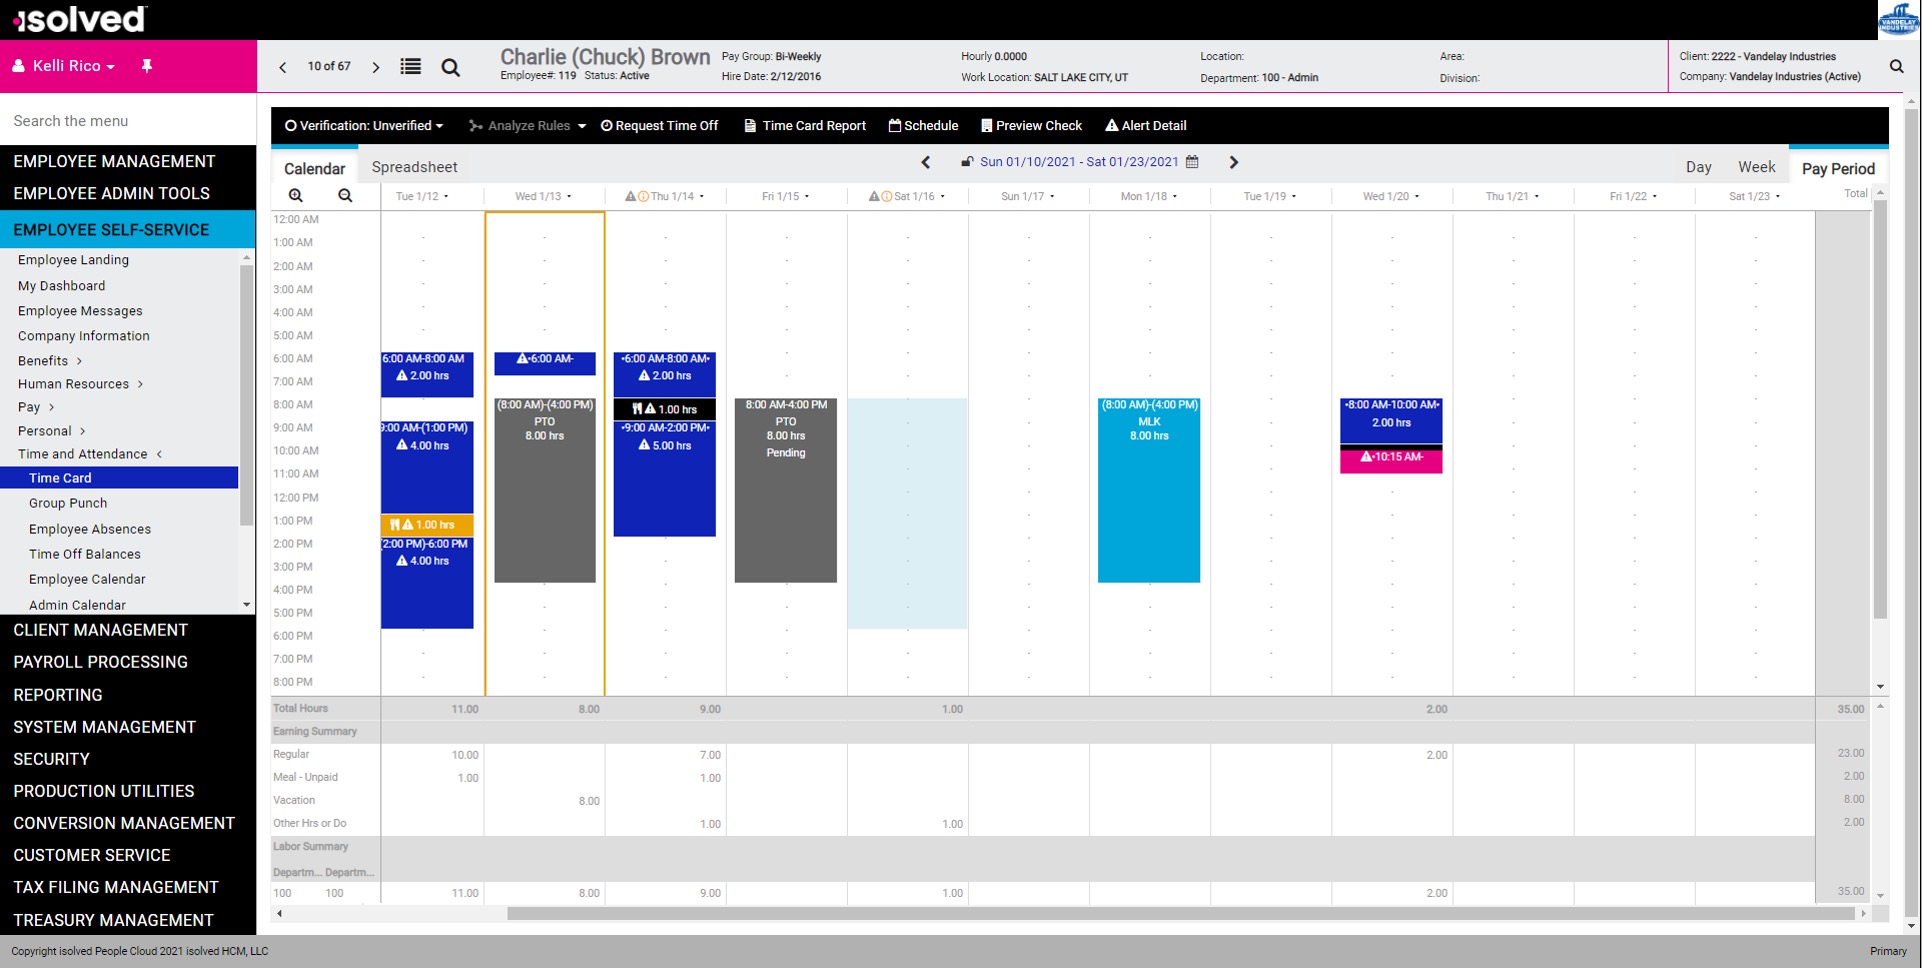
Time card updates
Employee time
- The current day is highlighted with a gold border.
- Hours worked, including blocks of time between in and out punches, are displayed with a royal blue background.
- Meals and breaks have a black background.
- Pending and approved time off has a grey background.
- Company holidays have a turquoise background.
Alerts
- Critical and high alerts are shown in pink.
- Medium alerts are shown in gold.
- Low alerts are shown in the same royal blue as worked time.
Schedules
- Employee schedules will continue to use the colors defined on the Manage Shifts screen.
New Employee Admin Tools menu
A new menu, Employee Admin Tools, has been added to the left-hand menu structure. Some menu items from the former Employee Management and Client Utilities menu were relocated here; other options have been added, too. The intention is to consolidate Employee Administration tools into one area.
As you can see from the illustration, there are three new primary submenus under the Employee Admin Tools menu.
- The Employee Administration submenu now contains Initiate Onboarding, the Pending EE Dashboard, the Self-Service Management screen and a few other menu items.
- An Employee Analytics submenu will be added which will include some new menu options (e.g., Employee Birthdays) and older options (e.g., Employee Contacts) that were relocated.
An Employee Utilities menu has been added. It now contains items related to employee administration (Employee Change Log, Employee Mass Change wizard, Wage/Tax Adjustments) relocated from the former Client Management menu.

Remember: You may see different menu items based on the roles that are assigned to you as a user. If you have any questions about the menu options that you have available, please reach out to your assigned payroll specialist.
Summary of employee menu changes
To help you become acquainted better with the new menu structure, below is a table summarizing changes.
If you have trouble finding a specific menu item, try using the Search the menu feature.
| Module | Menu name and location in version 6.11 | Menu name and location in version 7.1.0 |
| HR | Employee Management > Employee Change Log | Employee Admin Tools > Employee Utilities > Employee Change Log |
| HR | Employee Management > Employee Management Tools > Employee Dashboard | Employee Admin Tools > Employee Analytics > Employee Hires and Terms |
| HR | Employee Management > Employee Management Tools > Employee Hire > Initiate Onboarding | Employee Admin Tools > Employee Administration > Initiate Onboarding |
| HR | Employee Management > Employee Management Tools > Employee Hire > Pending EE Dashboard | Employee Admin Tools > Employee Administration > Pending EE Dashboard |
| Time | Employee Management > Employee Management Tools > Employee Scheduling > Default Schedule | Employee Admin Tools > Employee Administration > Employee Scheduling > Default Schedule |
| Time | Employee Management > Employee Management Tools > Employee Scheduling > Scheduler | Employee Admin Tools > Employee Administration > Employee Scheduling > Scheduler |
| Time | Employee Management > Employee Management Tools > Employee Scheduling > Schedule Import | Employee Admin Tools > Employee Administration > Employee Scheduling > Schedule Import |
| Benefits | Employee Management > Employee Management Tools > Benefit Enrollment Dashboard | Employee Admin Tools > Employee Administration > Enrollment Management |
| Benefits | Employee Management > Employee Management Tools > Benefit Evaluation Utility | Employee Admin Tools > Employee Utilities > Benefit Evaluation Utility |
| HR | Employee Management > Employee Management Tools > Self-Service Management | Employee Admin Tools > Employee Administration > Self-Service Management |
| HR | Employee Management > Pending Termination Dashboard | Employee Admin Tools > Employee Administration > Pending Terminations |
| HR | Employee Management > I-9 Management Dashboard | Employee Admin Tools > Employee Analytics > I-9 Audit |
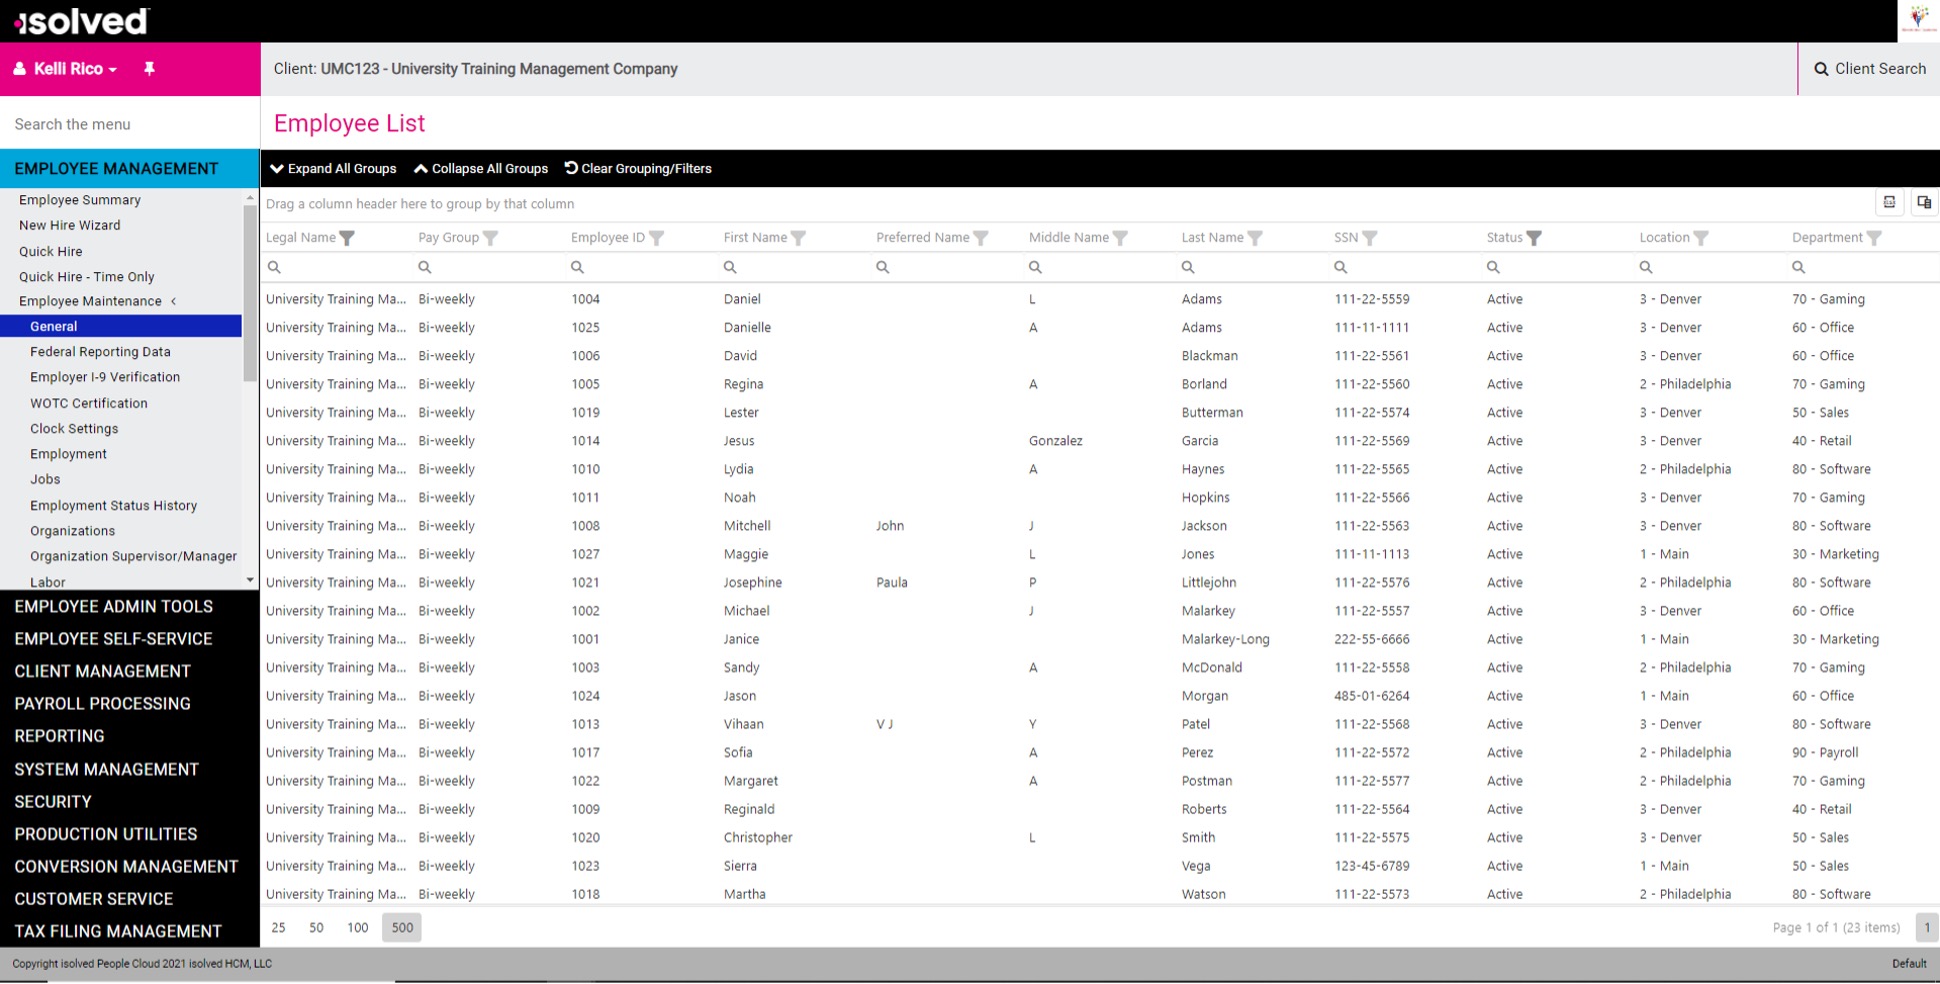
Employee Summary List View Updates
With this release, a new Employee List view is available when you go to the Employee Summary screen. With it, you can customize your view to locate employees more easily. You can also choose which columns are displayed and group employees by organization values or other employee assignments. Plus, you can add additional employee fields like status and job – options that were not available before.
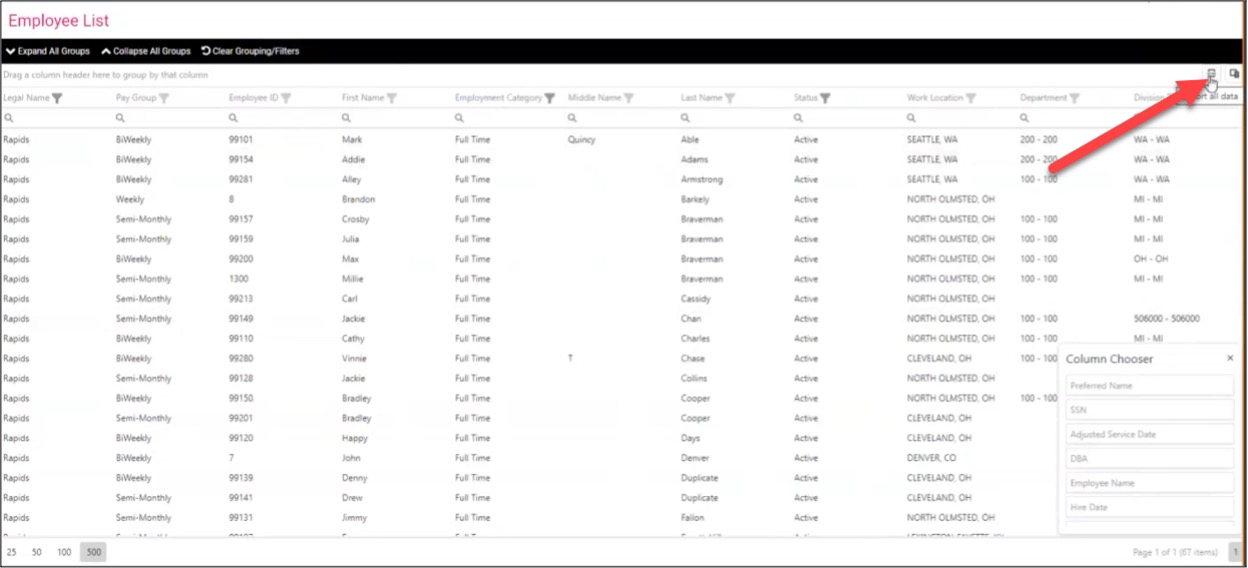
Choosing columns
The Column Chooser icon located in the top right-hand corner will launch the Column Chooser pop-up (see illustration). From there, you can drag-and-drop columns to and from the Column Chooser into the Employee List to customize your list.

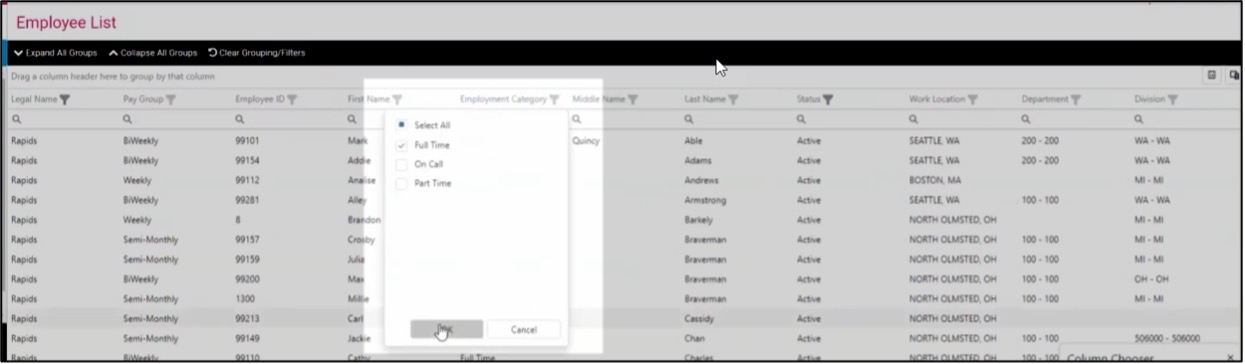
Filtering by column values
You can now filter by values within a column. For example,, if you want to filter to only see employees with an Employment Category of Full-Time, you will first make sure that the Employment Category column is included in the Employee List using the Column Chooser (see above). Then, you can choose the column header, select the values you would like to filter that column by, and click OK. Your Employee List will then only display those employees with the values you selected in your filter options.
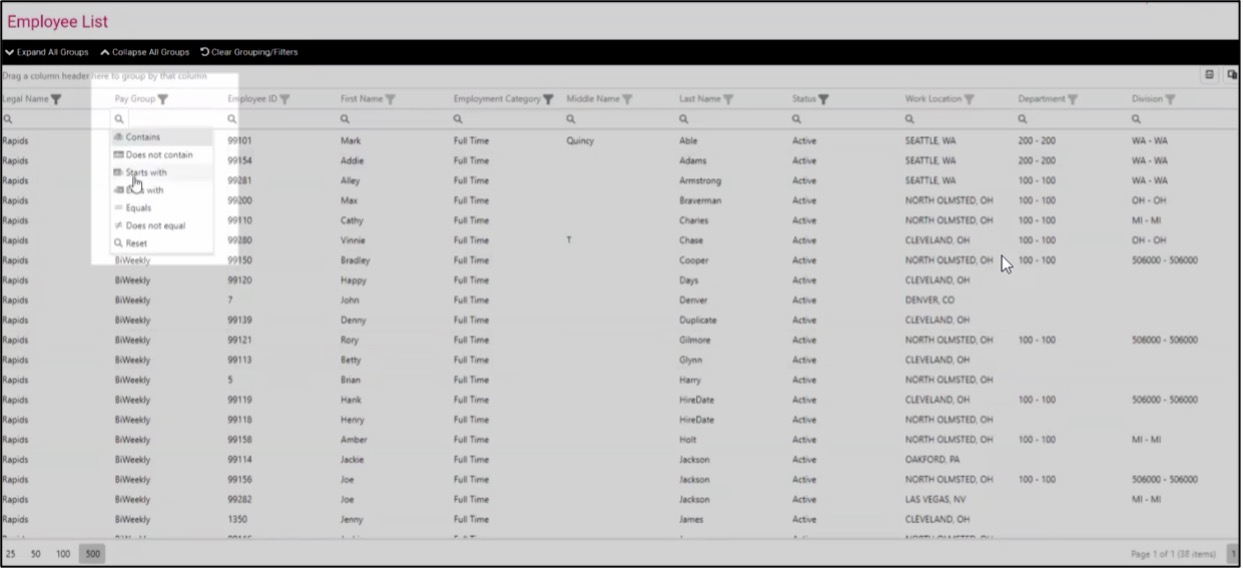
Searching column values
You can use specific search criteria for searching for values within a column. When you click the magnifying glass symbol under the column header, you’ll be presented with different search properties like “contains” and “starts with.” You can then the enter the value to search.
Exporting the Employee List to Excel
You can export the Employee List with the columns that you have selected and the filters that you have applied. Click the Export All Data button in the top right-hand of the screen. The data will then download as an Excel spreadsheet.
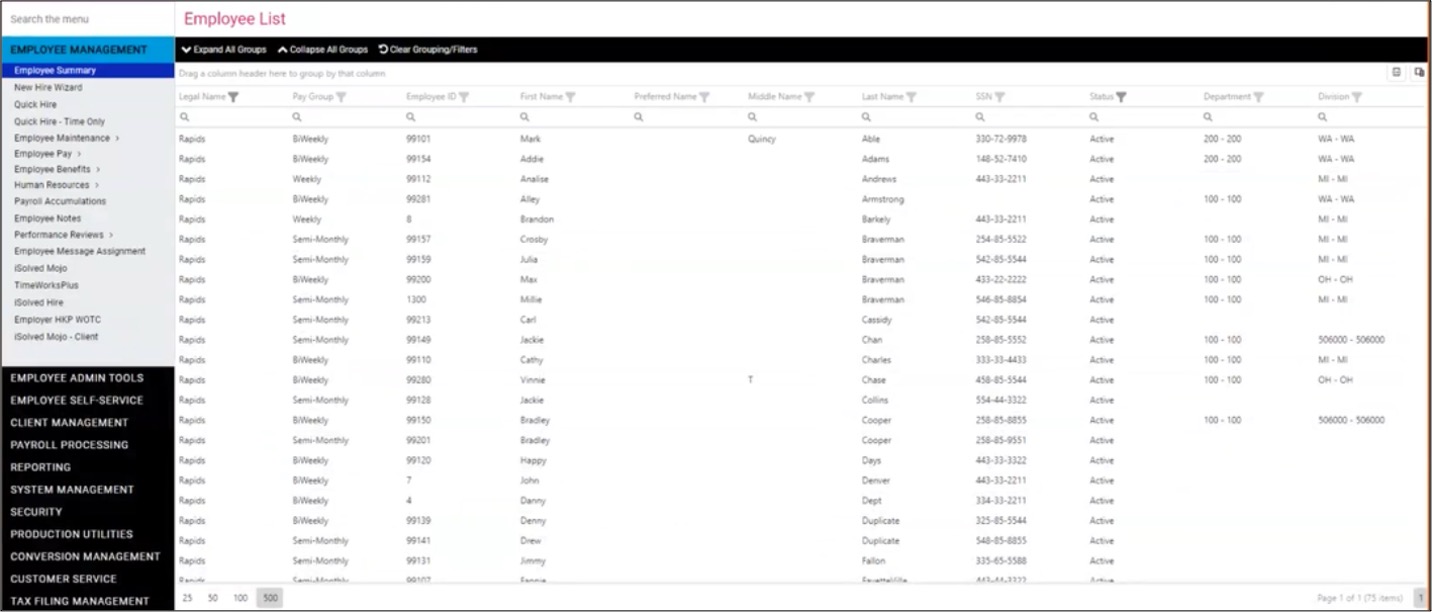
Grouping by column values
There is also a field that will allow you to group employees by unique column values by dragging the column header (pictured below). After grouping by that column, you can expand each category to see the employees included. You can also drag multiple column headers to this field if you would like additional sub-groupings applied.


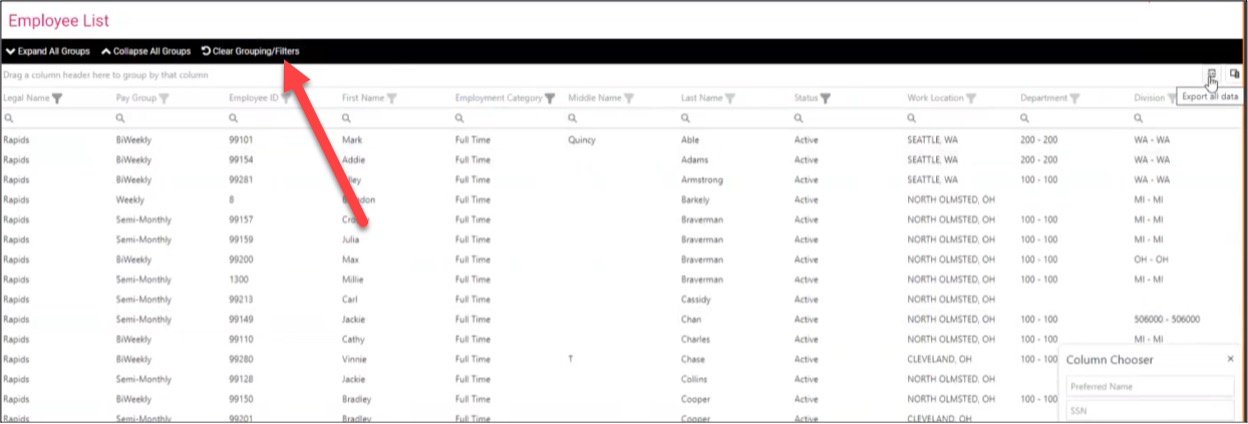
Clearing grouping or filter selections
You can click the Clear Grouping/Filters button in the black action bar to clear the grouping and filtering selections you’ve made.
Your payroll specialist can also assist you with making default selections for the display of your employee list.
Emergency Contacts dashboard
An Emergency Contacts dashboard has been added to assist users in easily identifying and creating emergency contacts lists. The same list customization tools (e.g., Column Chooser) that are being added to the Employee list are also available on this Emergency Contacts listing. The default view of this list will list the contacts by call order.
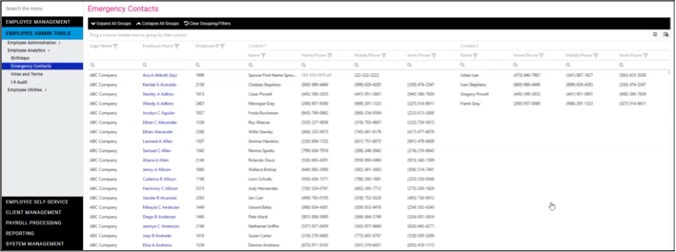
If you need more information about the employee’s emergency contacts, click their name (highlighted in blue) to access that employee’s Contacts screen.
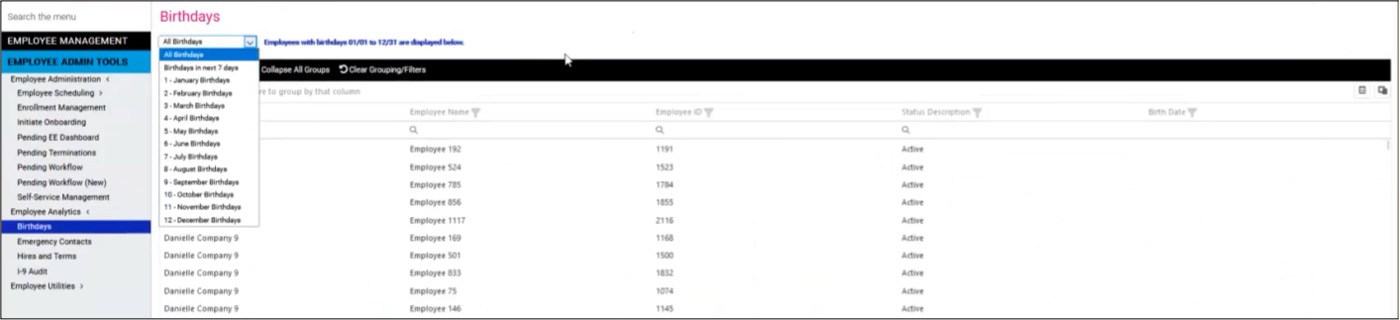
Employee Birthday dashboard
The Birthdays dashboard will display employee birthdays coming up within the next seven days. You can also view birthdays by month or all employee birthdays at once. (Note that the birthday feature will only display the month and date, not the year.)
Access to Jobs screen for salary-restricted users
Previously, salary-restricted client users were unable to access the Jobs screen. This was because the Salary Grade field was displayed on the Job screen. Now, anyone with a role that provides access to the Jobs screen will be able to access the screen. For salary-restricted users, the Salary Grade field will not be displayed.
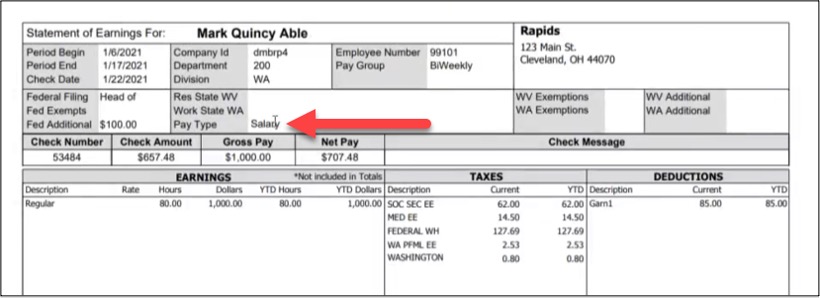
Updates to pay stubs
Employee Social Security numbers will be removed from all check formats. Employee pay types will be displayed on their respective pay stubs.
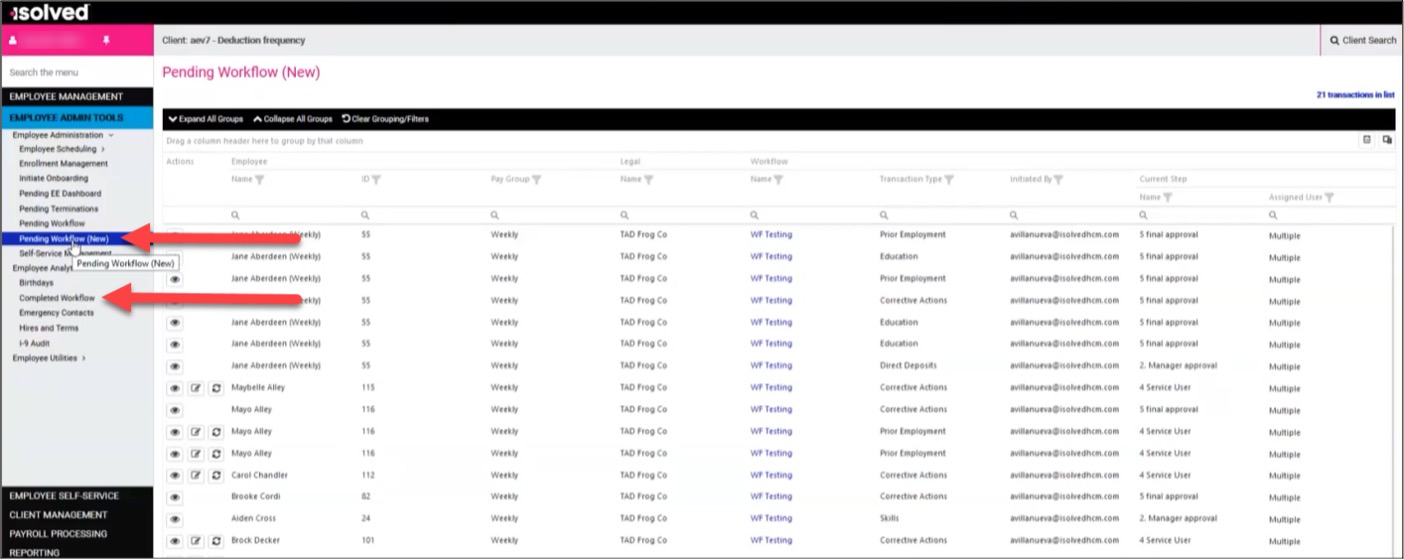
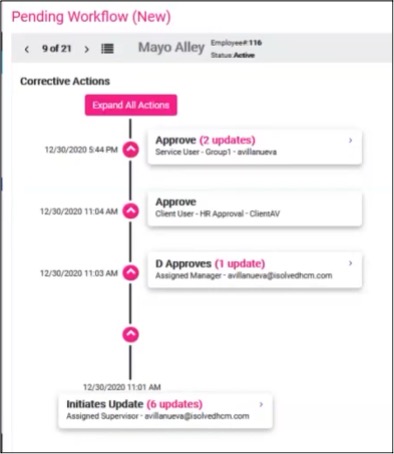
Pending Transactions and Completed Workflow
The new Pending Workflow screen located in the Employee Administration submenu under the new Employee Admin Tools menu lists employees with pending approvals.
The default view of this list includes:
- Employee name
- ID
- Pay group
- Legal Company
- Workflow name
- Transaction time
- User who initiated the transaction
- Current workflow step
- User group assigned to the current step
If the workflow has multiple users or user groups assigned to a particular step, it will display “Multiple” and you can reveal those assigned by hovering over that word.
Workflows that have been completed will display on the Completed Workflow screen under the new Employee Analytics submenu.
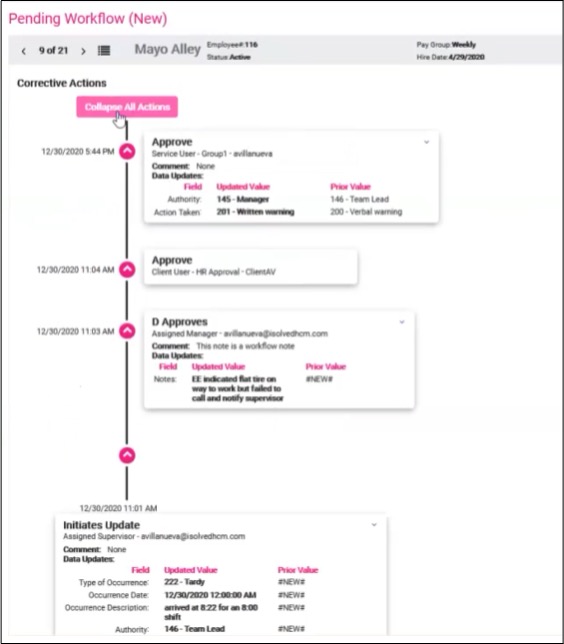
As part of the update, isolved has also created a timeline view of the workflow. This can be accessed by clicking on the View button next to each pending workflow listed. This timeline will show all steps that have already been completed in reverse chronological order, with the latest actions appearing at the beginning.
The Expand All Actions button will provide a more detailed view of each step of the workflow.
Time
Notes field available in Leave Accruals
A Notes field has been added to the Leave Accruals screen under Employee Management > Employee Benefits.
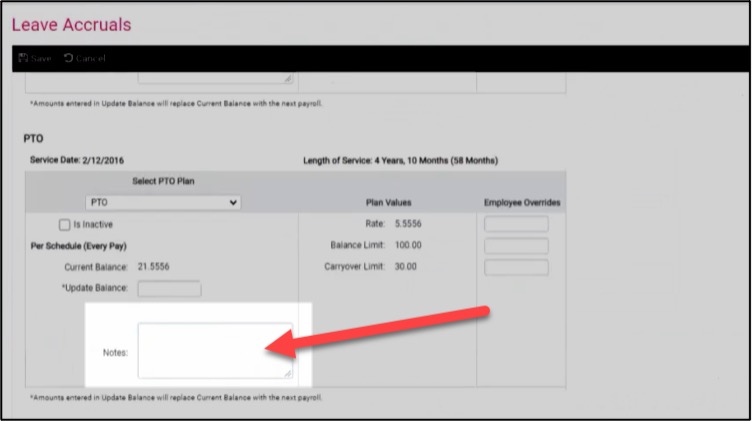
In order to review notes associated with accrual balances changes, navigate to the Accrual Balance History screen. A new balance update indicator (shown below) shows when a manual balance update has occurred. Hover over the i icon to read notes that were added on the Leave Accruals screen for that payroll period.

Absences can be split when they cross midnight
Prior to this release, absences that cross midnight were recorded on the day they began. For example, if an employee’s eight-hour absence began at 8 p.m. on Monday and ended the next day at 3 a.m., it would be recorded as an absence using Monday’s date.
After this release, absences can be split based on the policy group settings. Once time is committed, two absences will be shown in payroll, since the hours will be recorded on the day they were worked. Using our previous example of a seven-hour absence beginning at 8 p.m. on Monday, the absence would be split into a four-hour absence on Monday (8 p.m. – midnight) and a three-hour absence (midnight – 3 a.m.) on Tuesday.
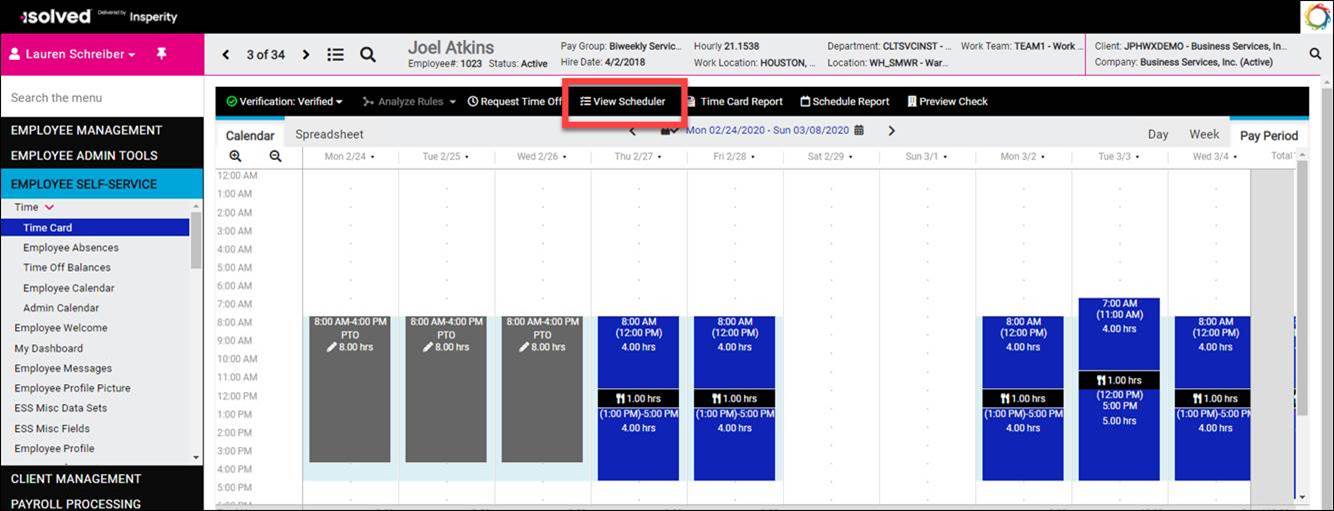
Scheduler button added to employee Time Card
For clients using schedules in isolved Time, employees can now quickly access the Scheduler from the employee Time Card. A new View Scheduler button has been added in the navigation bar on the Calendar view.
To sum up
The early February isolved release offers new menus, functionality and a fresh platform look. Again, if you have any questions about the changes – or need help understanding how to navigate the platform in the wake of the updates, please contact your Insperity® payroll specialist.