Using isolved to support the New York City Pay Transparency legislation

New York City has amended its human rights law to require salary ranges on all job postings. The range for the listed maximum and minimum salary would extend from the lowest salary to the highest salary that the employer in good faith believes it would pay for the advertised job, promotion or transfer.

This law takes effect on May 15, 2022

  • Employers with four or more employees in New York City will be required to add salary ranges (minimum and maximum) to external job postings, as well as internal postings for promotion or transfer.
  • Independent contractors are included in the employee count; however, temporary employees (through an agency) are not.
  • Reminder: NYC already has a law that a candidate’s salary history cannot be requested during the hiring process. The state of New York has that, too, plus a pay equity law that prohibits unequal pay based on a protected classification.
  • Currently, the geographic scope of the law is uncertain.

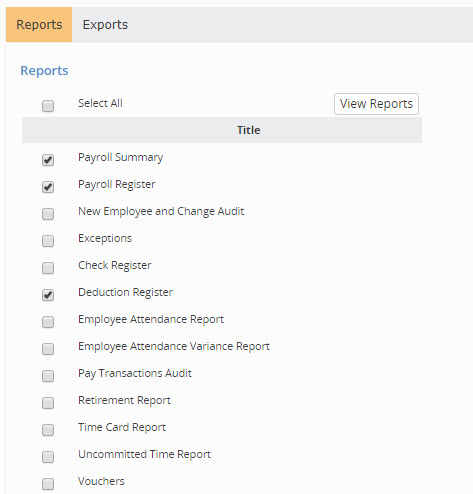
To learn how isolved can help support you with this new law, refer to the Insperity® Help Center article, Using isolved to support the New York City Pay Transparency legislation. This article walks through how to include salary ranges in your Attract & Hire postings, setting up salary grades, and assigning jobs to salary grades. 

Complying with minimum wage laws

Many states and localities have increased their minimum wage. It’s important you understand the minimum wage rules that apply to your employees and, if applicable, make any necessary changes in your isolved system. 

The reporting tools in isolved make it easy to identify employees paid below minimum wage, specifically when a location’s minimum wage is changed. For more information on identifying employees paid below minimum, see the How do I find employees who are being paid below minimum wage? article in the Insperity® Help Center.  Also, get details on enabling filters in the Employee Salary/Hourly Rate List. 

Have you used iSolved’s report writer tool?

The report writer tool enables you to build custom reports that meet your business’s unique and specific needs. Access it by visiting the Reporting menu > Report Writer page, as seen below.

Primary functions of the report writer include:

  • Creating new reports
  • Editing existing reports
  • Deleting reports

The report writer is a quick and efficient way for creating reports that is easily understood by employees with varying skill sets. It walks users through each customization tab, such as report type, report title, page layout, default report format, columns, sorting, totaling, page breaks, filters, column headings, column size, font and font size.

You can access the full Report Writer’s User Guide in iSolved® University.

If you need assistance with the report writer, or any of iSolved’s reporting tools, please reach out to your assigned payroll specialist.

Making the most of iSolved® Employee Self Service

iSolved® Self Service allows your employees and managers to help manage their HR information. This includes employee demographics, position, salary information, skills, assets and compliance information. Employees and managers can access their information quickly and seamlessly so you can focus on what’s most important – supporting and growing your business.

How can I grant my employees access to iSolved® Self Service?

There are three ways to grant self-service access to your employees.

  1. The Onboarding Wizard
    Completing the Initiate New Hire Onboarding Wizard triggers iSolved® to send the onboarding welcome email to the email address entered in the Email Address field.

    This email will include a link to authenticate the new user account and begin the onboarding process, as seen below.
  1. The New Hire Wizard or Quick Hire Tool
    When an email address is entered into the Self Service Email field and the Enable Self Service Access checkbox is checked, an automated email will be sent to the email address entered providing information on creating an iSolved Self-Service account.

    This email will include a link to authenticate the new user account and the necessary credentials, as seen below.
  1. Employee’s General Page
    If Self-Service was not initiated for the employee while completing the New Hire Wizard or Quick Hire Tool (as documented above in step two), this function may be turned on by following these steps.
     
     
    • Step one: Navigate to the Employee Management menu > Employee Maintenance > General.
    • Step two: Enter the employee’s email address in the Self Service Email field, and check the Enable Self Service Access checkbox.

How do I unlock my employee’s iSolved Self-Service account?

Contact your dedicated payroll specialist if you need assistance unlocking a user account. You can find contact information in the Account Reps section of the Client Landing Page, shown below.

NOTE: You are unable to unlock employee accounts without our assistance.

Tips for accessing iSolved

How do I login to iSolved?

  1. Go to the iSolved login page: insperity.myisolved.com
  2. Enter your User ID and Password, and click the Login button.

*NOTE: We suggest that you bookmark this URL for easier access.

What do I do if I forgot my iSolved username or password?

  1. Go to insperity.myisolved.com and click “Forgot Password?”.
  2. Enter your username and click Next.
  3. Select the delivery method to receive a temporary authorization code and click Next.
  4. Once the temporary authorization code is received, enter it and click Next.
  5. You will be prompted to answer a security question and create a new password. Then click Next.
  6. Click the Login button to return to the iSolved login page and enter your new password.

NOTE: Insperity support personnel are not able to retrieve passwords in iSolved.

Managing client users in iSolved

Managing client users in iSolved

Following the recommended practices below can help ensure your organization maintains security of your iSolved HCM system.

  1. Only create client users for administrative users
    Supervisors and managers can access information, approve timesheets and approve workflows for their direct reports through Employee Self-Service (ESS) without being designated as a client user.
  2. Assign the minimum number of roles necessary for the client user to perform their job function in iSolved HCM
    Don’t give client users access to parts of the system they don’t really need for their role.
  3. Disable client users as a standard part of your employee termination process
    When you terminate an employee in iSolved HCM, it is recommended that you check the client user section and disable any accounts for that employee.
    Terminating an employee in iSolved will NOT automatically disable their client user account.
  4. Don’t delete client users
    If a client user has been active in iSolved HCM, you should not delete their account. Instead, you should disable their account to remove their access. If you delete a client user, all their logged activity history will be deleted, and you will no longer have a record of their access to the system.

iSolved makes reporting easy

The iSolved platform makes reporting easy by providing standard reports that are built and ready to run, along with a tool to build your own. All report options can be found under the Reporting menu on the left-hand side of your screen.

If you are not familiar with the Reporting menu, we have outlined some of the most popular features you should know about below.

 Client reports

Go to the Client Reports menu to run standard reports, as pictured below. The search feature at the top of the page allows you to easily filter through the long list of available reports and narrow down your selection.

Helpful hint: With year-end approaching, make use of the Employee W-2 Preview report that reports to verify employee W-2s prior to the end of the year and final processing.


Report archive

Use the Report Archive menu to access reports that were produced during any previous payroll. This screen allows you to select a specific payroll run and view any payroll reports that were generated with that payroll.

Quarterly reports on demand

Any previous quarterly tax filing reports that were produced in iSolved are stored in the Quarterly Reports On Demand menu option. These files are made available by the 15th of every month following the month of filing (for example: for 3rd quarter ending on Sept. 30, quarterly report packages will be available by Nov. 15).

Combining reports

The Continuous Reports Archive menu makes it easy to combine several payroll reports into a single file. All you have to do is select the reports you want to include and click save as seen below.

Custom Reports
The Report Writer Tool is another great way to build custom reports to meet your unique and specific needs. You can access the user guide for this tool in iSolved University. If you need assistance looking for a specific report, please reach out to your assigned payroll specialist.